In this blog post we talk about one approach to do a #fullbellyadjustment, also called #panniculusadjustment to the #sculthorpepants by @munaandbroad, one of my first experiences in learning to fit pants to my new body after kids.
Hi lovely curvy sewists, I’m Monserratt Lopez. A brand new contributor to the curvy sewing collective and a long time sewist. You might remember me from a while ago on my blog MexicanPink or from IG @monserrattl,
I hope you are doing well!! This period of isolation has revived the desire in me to create the space to improve my #selflove and the acceptance of this very different body. I’ve decided to give up on trying to change myself to fit some social convention of health. I have taken the decision to start to respect, to love, to care, and to accept myself the way I am in this present moment.
As part of this journey, I’ve decided to make 2020 my #yearofpants. How exciting!! I’m happy to be taking the time to sew even if only briefly every day. I’m excited to feel the thrill of wanting to sew more and more. I mean, I’m still exhausted by the end of the day after the kids fall asleep, but this effort is really being beneficial for my #selfesteem right now. #sewingisselfcare
On this post, I’ll take you through my process to make a #fullbellyadjustment, also called #panniculusadjustment to the #sculthorpepants by @munaandbroad. We’ll discuss the first muslin, how I decided on the fitting alterations I wanted to make, how I translated them to the pattern and those reflected on the second muslin.
To that, I bring you my first muslin for my #sculthorpepants by @munaandbroad.
I made straight a size 4.
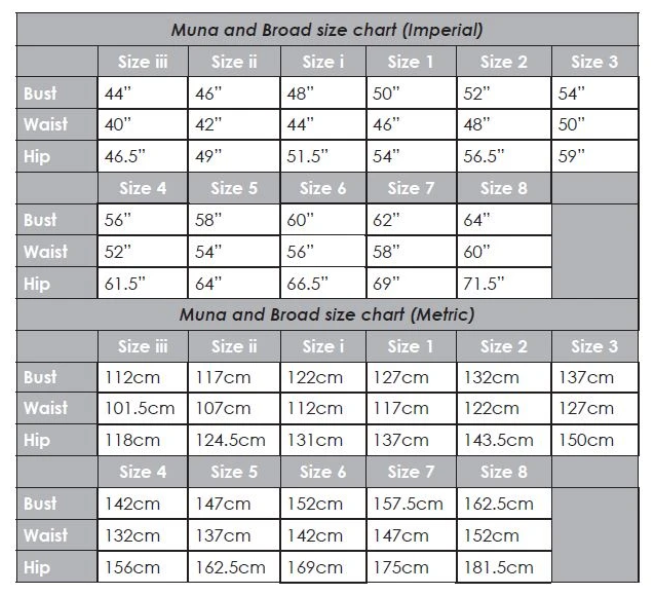
My measurements:
- Upper burst: 47″
- Full bust: 50.75″
- Lower bust: 42″
- Waist: 50″
- Hip: 61″
Here is what the first muslin looked like.


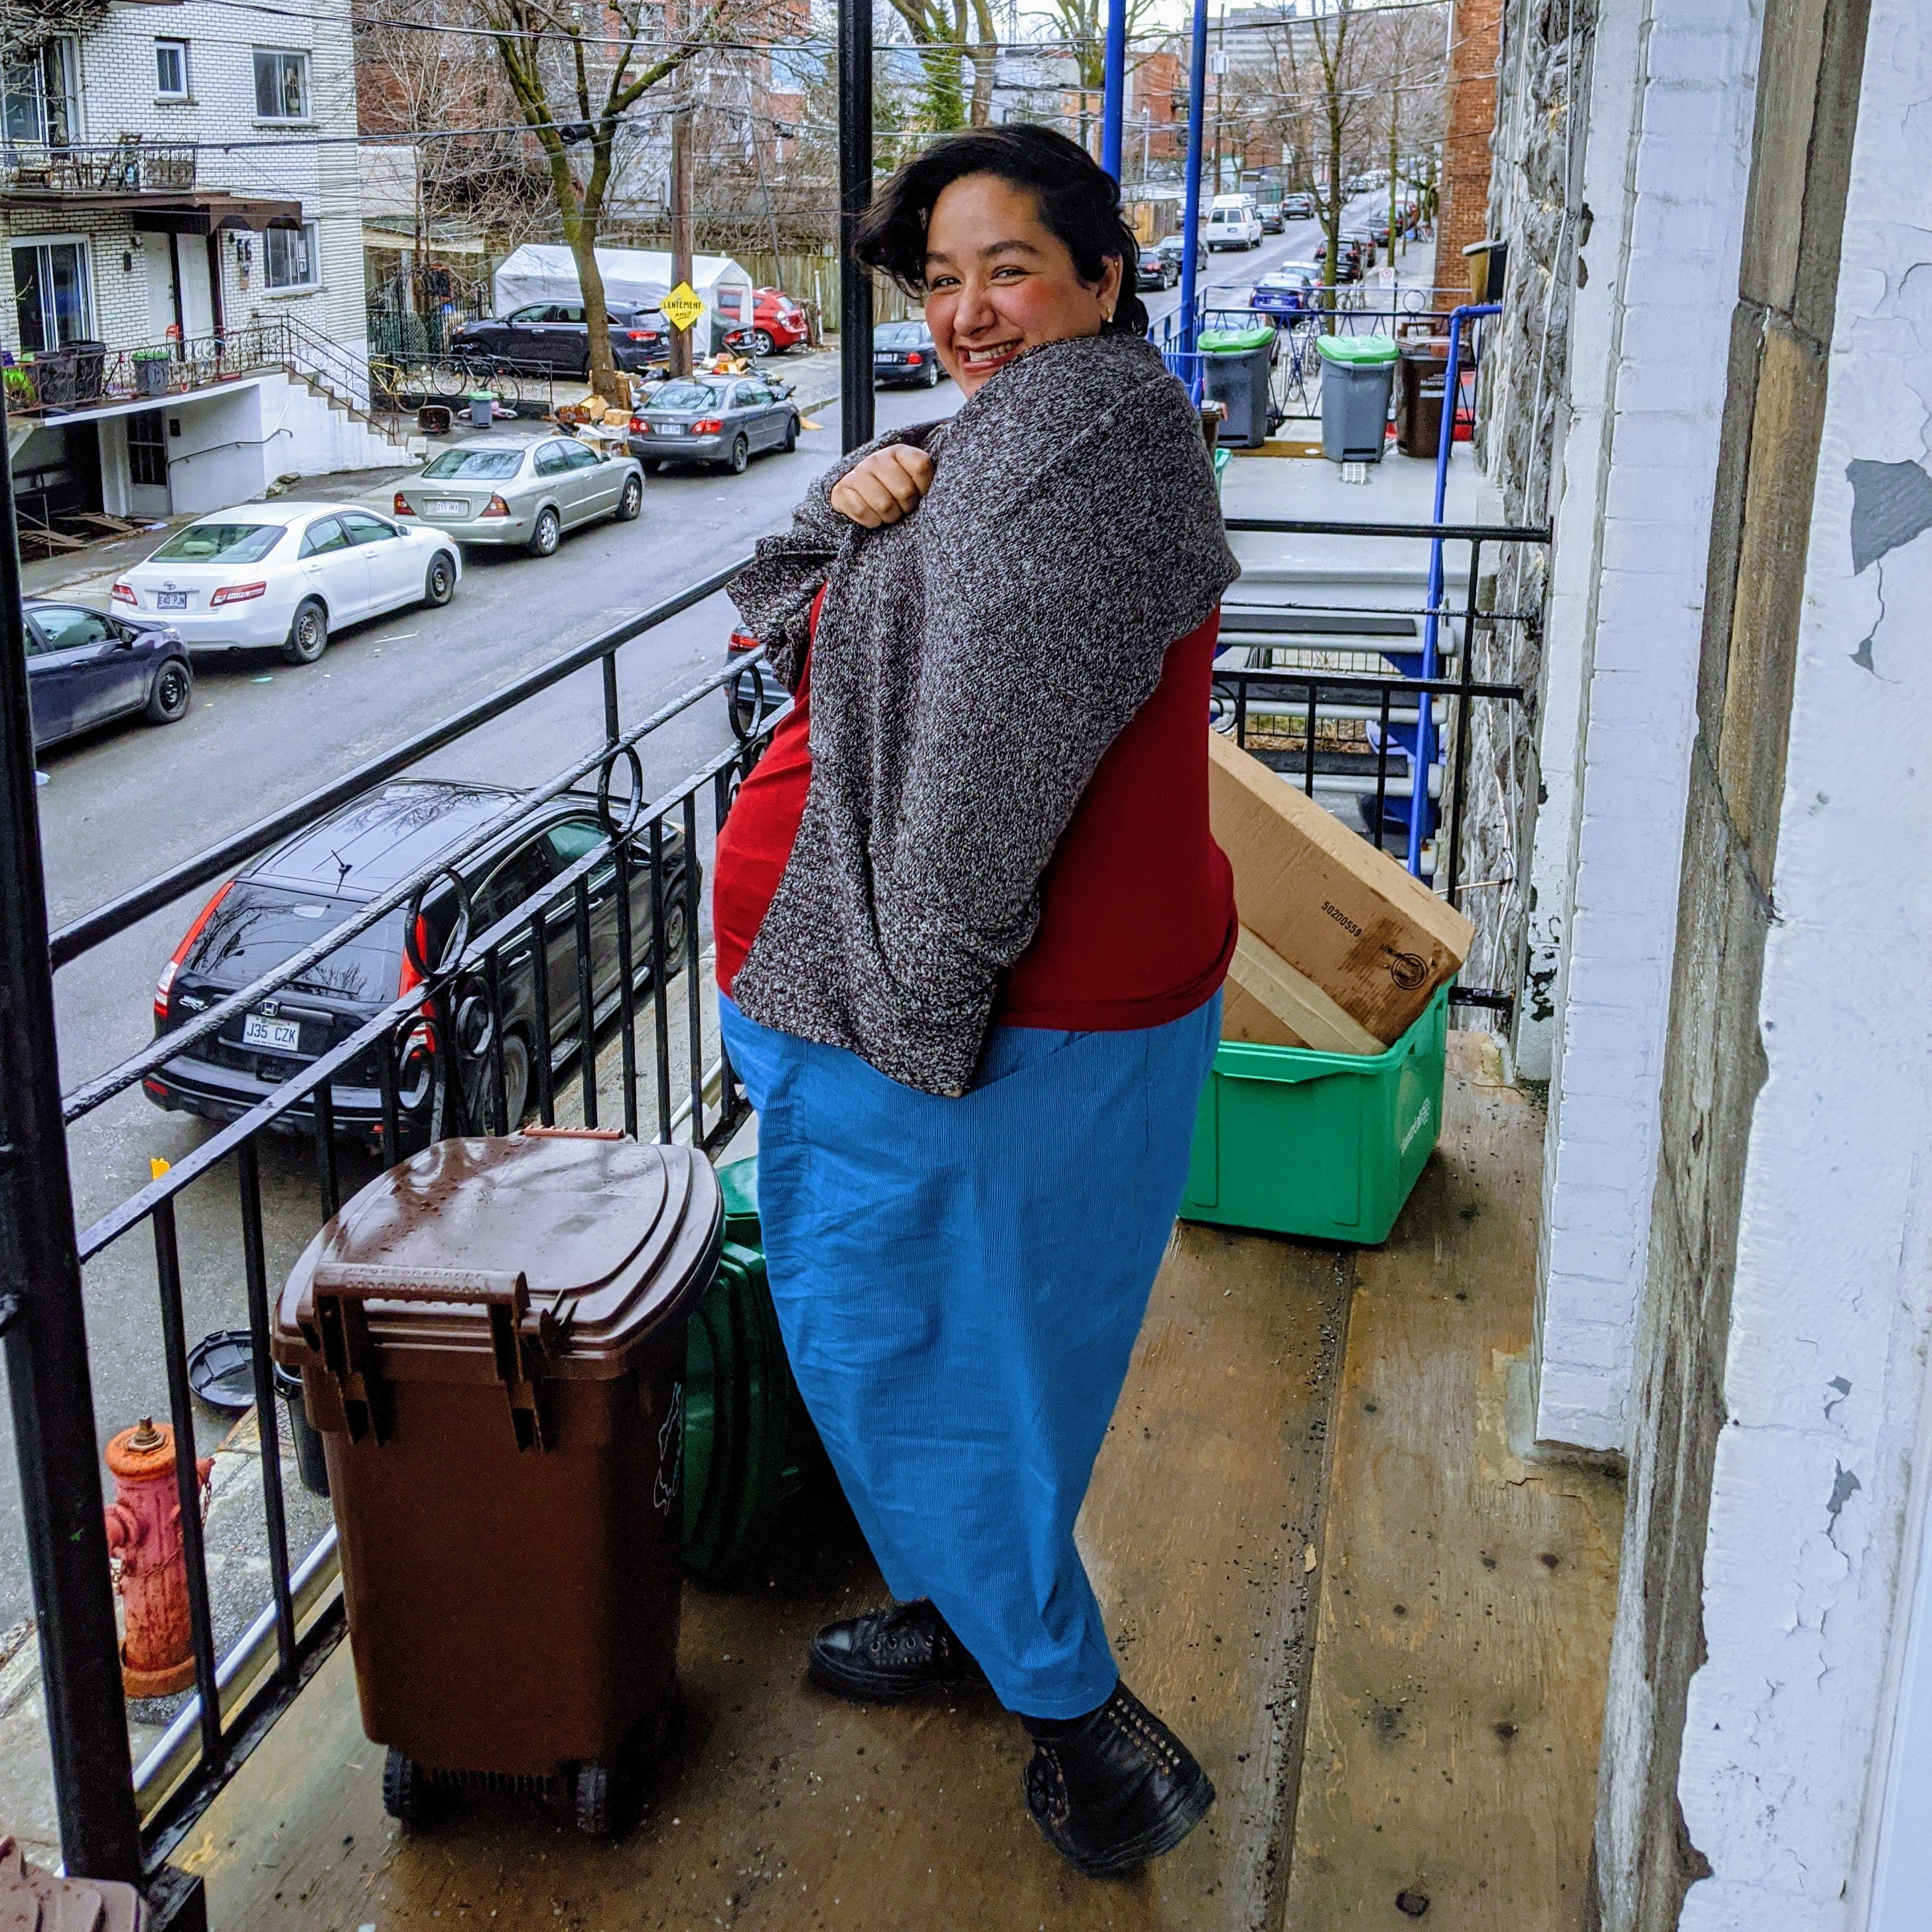


Although I loved the way these pants made me feel and it was a huge improvement in terms of comfort over the way many, many commercially available pants fit me, I wanted to learn how to bring the waistband to follow a horizontal line. I wanted to experiment and see how that works for me and my body.
In order to bring the front of the waistband up, @leila_sews, co-creator of the pattern, suggested that I modify the front of the pants with a #fullbellyadjustment, also called #panniculusadjustment.
It took a couple of days to feel brave enough to cut through a pair of pants that I quite liked, but so I did. I mean, this journey is about learning and experimenting, right?
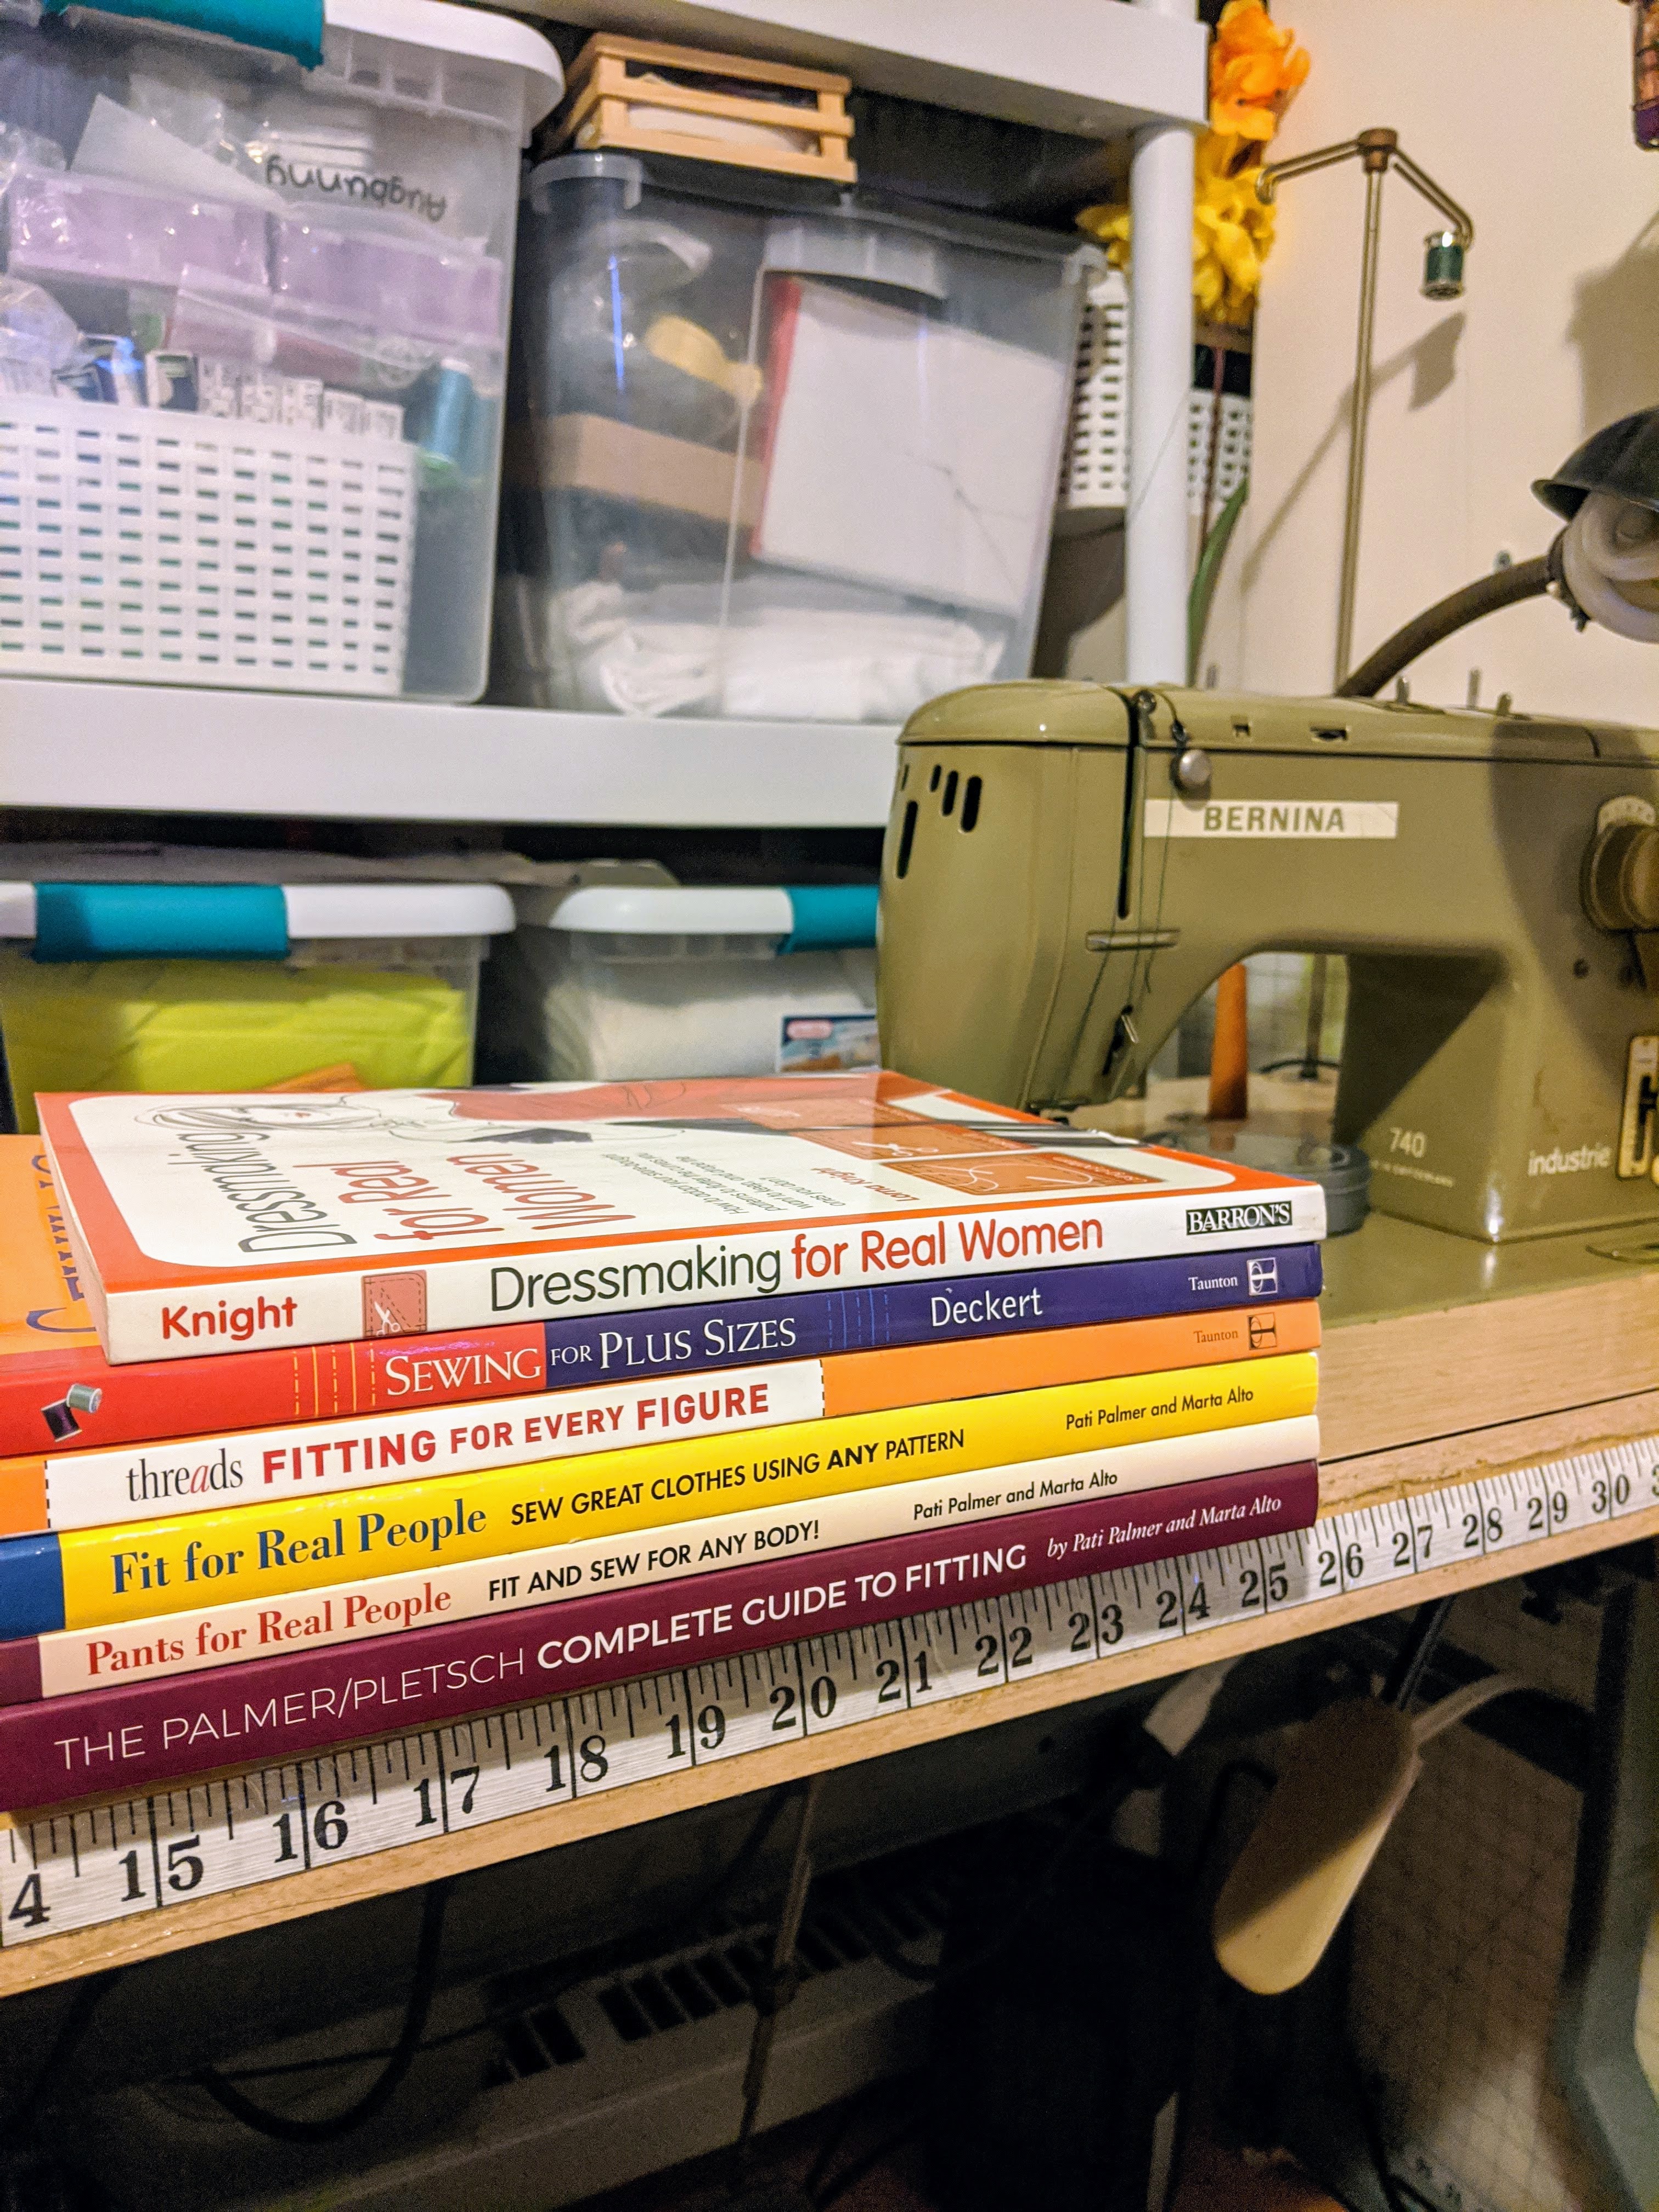
I looked into my fitting books, the @curvysewingcollective tutorial for full tummy adjustment, and further discussed with @leila_sews, @drcris, and @sewfearless. These are the sewing books I found most helpful on this subject.


So I went for it! Here are the changes to muslin #1.
- I first wore a ribbon around the horizontal line where I want to have the waistband of my pants to reach. I measured the distance between the reference ribbon and the waistband of the pants. (3”).


- I extended the horizontal crotch curve. To do this, I vertically slashed the horizontal line of the crotch curve. Then I tried my pants again. I realized that if I was to pull the waistband all the way to the reference ribbon, I would feel like there was an evident unbalance between the front and the back of the pants most evidently felt at the hem. You can see in the images, that when the waistband was pulled all the way up to the reference ribbon, then the ankles are touching the back of the pants, whereas when the waistband goes up only slightly, the pants are more in balance at the bottom. So if you are doing this modification, you rather have to feel how far up the pants want to go while the hem of the pants remains balanced between the front and back.
- I measured how far the pants had gone up with reference to the reference ribbon. (1.5”)
- This translates in a 1.5″ spread.
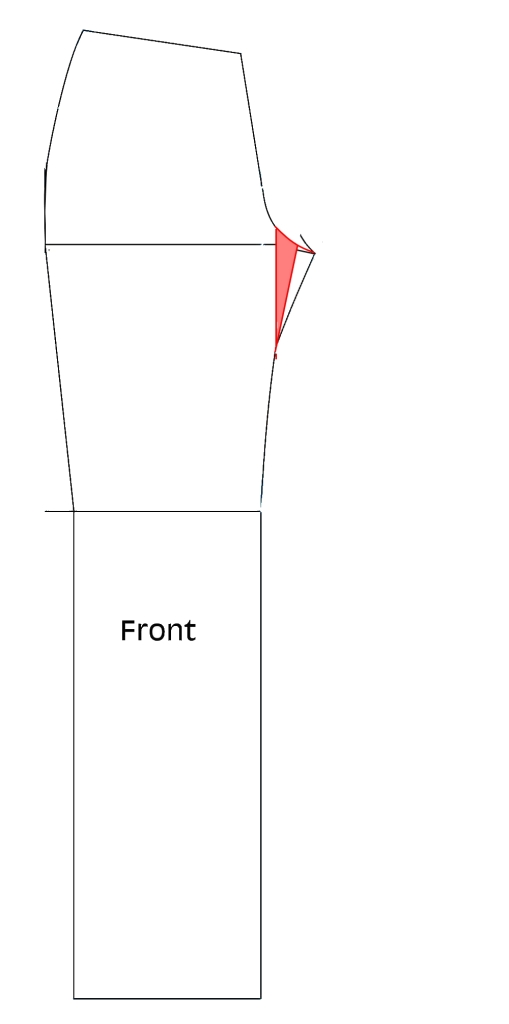

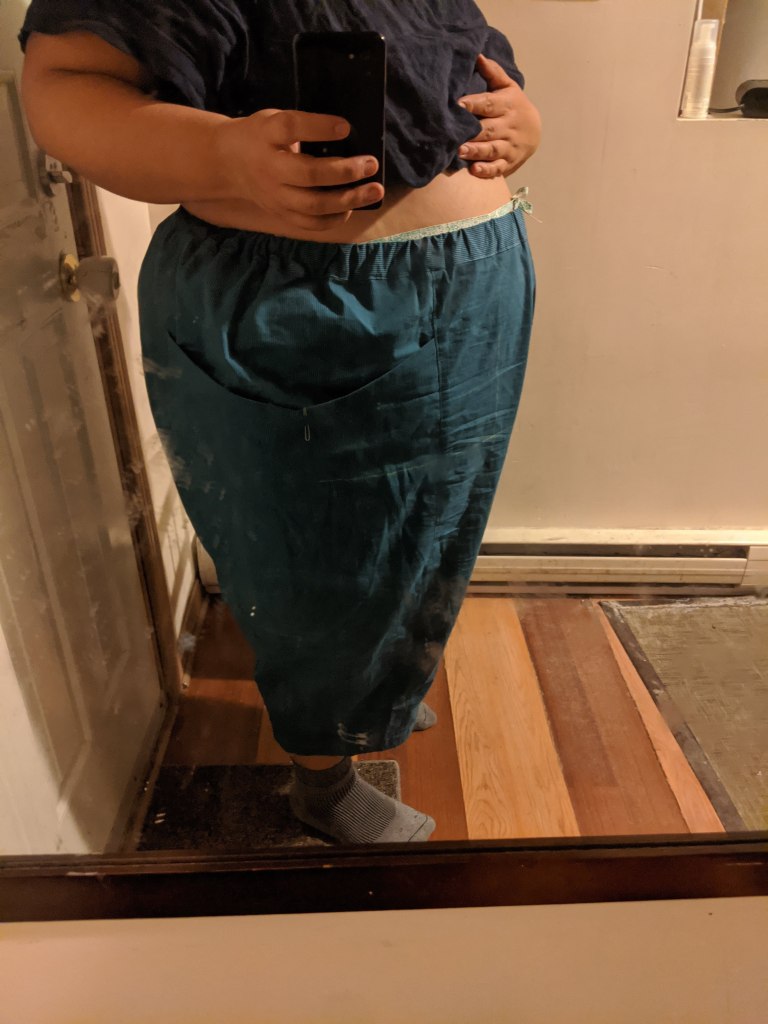


- The next step was to horizontally spread the area between the side seam and the center front so as to give more space at the front for the panniculus or lower abdomen to fall into.
- To decide at which height I should cut horizontally in order to spread the front piece, I wore my pants again and eyed the height I liked.
- I took my scissors and a leap of faith and I cut through my pants!!! Thanks, @leila_sews for your encouragement to do this!
- I traced the lines where the spread would have to be done and then I cut through!
- Shown in the diagram of the general way in which this alteration should be done, and below is muslin#1 with cuts for this alteration.


- After cutting the pants through, and knowing that the original distance between the waistband and the ribbon before any alterations were done was 3″, and taking into account that the last alteration added 1.5″, I decided to spread the horizontal line I cut in the last step by the remaining 1.5″.
- In order to fix both spreads, I cut a couple of pieces of fabric big enough to draw an H with a 1.5” width, and a couple extra inches to be able to attach them to my pants with my fork pins. The 1.5” reflect my 2 spread distances.
- I put my pants on the table, I took my first H piece of fabric and pinned it to the vertical spread (closer to the crotch seam) aligning the bar in the H with the center front line. I took the second H piece of fabric and pinned it to the horizontal spread aligning the bar in the H with the center front line.
- I tried my pants on again and there it is! The pants went as high as the reference ribbon!! The pants were comfortable and balanced.


- As you can see above, this alteration requires slashing from the center front to where the side seam of the pants would normally fall. Because the construction of these pants includes a side panel, I attached the side panel and the front piece together and worked it out as if it was a single piece. This is what the alterations above look in diagrams for the #sculthorpepants pattern. In the slider below you can see what these changes look like in the actual pattern.

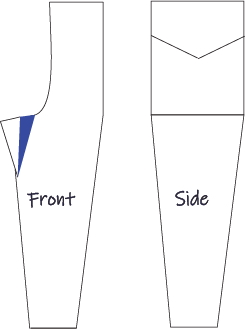


Here is what this changes look like in the pattern.
- In order to extend the front crotch curve, I slashed the front leg pattern at about 2” from the cross point between the front and the back crotch.
- Because there is a side leg panel to this pattern that includes the pocket and the side seam, I decided to work with the side leg panel as a single piece. To do this, I folded the pocket panel as the pocket should be folded, and align it to the lower side panel. This would be called my side leg panel.
- Since the #fullbellyadjustment, also called #panniculusadjustment is an adjustment that goes from the center front of the pants onto the side seam, I marked the side seam of the pants along the center of the side leg panel. I then attached the front leg panel and the side leg panel at the seam line (therefore the seam allowances overlap) and proceeded with the modification (as is shown in the slider image).
- Following the lines I had cut through on my original muslin, I traced a horizontal and a vertical line along which to slash the pattern piece. I slashed through the lines.
- The rectangle that touches the side seam rotates and the rectangle that touches the center front translates to the horizontal line above it.
- To finish this adjustment, I filled the new gaps with paper and softened the kinks where the original pattern lines were modified. These changes were transferred to each one of the involved pattern pieces.

Front leg panel: Vertical spread 1″ 
Front leg panel:
Vertical spread 1.5″ Horizontal spread 1.5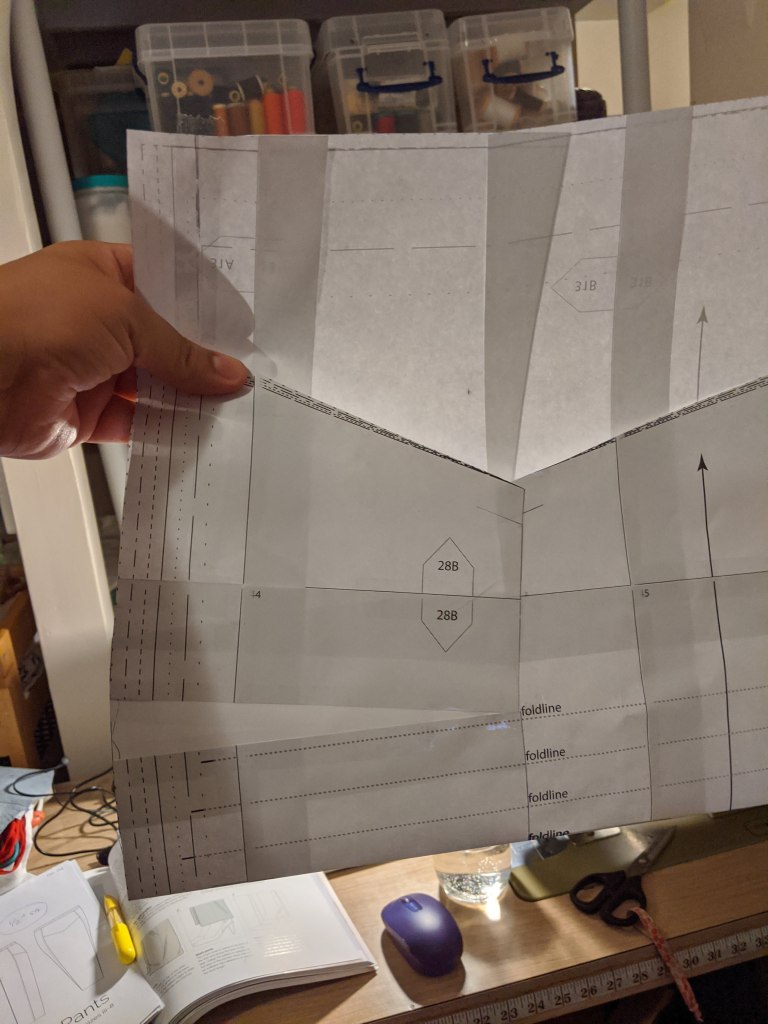
Side leg pocket panel:
Horizontal spread from 0″ to 1.5″
Side leg pocket panel fully extended:
Horizontal spread from 0″ to 1.5″
Side leg lower panel:
Horizontal spread from 0″ to 1.5″
Et voilà!!
Here is my muslin #2 of these #sculthorpepants by @munaandbroad. I made them in lightweight cotton chambray in light denim color. Taking the time to make a first muslin and cutting through it to figure out the alterations I wanted to do, really paid off! I also decided to make them 5” shorter than the original length and I deepened the pockets by 1.5″. They are beautiful, awesome and comfortable. I LOVE them!


That’s it! Please let me know if you find this useful. I’ll be working on a few more pants this year and learning more about how to fit them to my body. If that interests you, feel free to drop in here or on Instagram @monserrattl.
Would you try this? I hope to see more of you soon!
Besos,
Mon <3
Thank you so much for taking the time and trouble to write this post. I also have a full tummy and am frustrated with trying to find pants and or pants patterns to fit. I am going to try your suggestions. Looks like great ideas here! All the best to you and your family.
SO helpful, thank you!
I’m impressed! I think I could pull off the full abdomen adjustment most of the time, but the side panel throws a cog in it. You aced it, and the fit is wonderful.
This is so very useful – thank you for your in-depth description. I am just about to sew my first ‘real’ pair of pants and seeing your results is encouraging.
Thank you for a very comprehensive post on a full belly adjustment. It was such a good reas and I am book marking it for future reference.
It’s daring sewists like you who make these adjustments seem possible. Thank you so much!
Love this! You are a good teacher xxx
This is great. My only nitpick is that I would argue that a full tummy is not the same as a panniculus. I would say that what you show here is a full tummy adjustment, which is often helpful in fitting for a panniculus. But a panniculus is generally carried lower on the body, does not necessarily accompany a full tummy, and can benefit from different fitting adjustments. I would say a panniculus adjustment is more about scooping out the crotch curve a little to make it more of an L shape.
This was incredibly useful. I was about to do the exact same adjustment after the test and this will save me a lot of time. I’m also flat at the side and short..5′ so I’m going to raise the pocket if I can. It hangs in a hollow and looks dumpy on me.
Well done! : )
Thank you so much for the detailed instructions! Great job and I love to see the joy on your face. Welcome to the world of real women and who we are!
Oh Mon, this is a detailed undertaking right here. Love that you’ve shared tour hard work and hope it can help another sewist. Btw, the finished pants are so fab!
Such a beautifully detailed blog post – both the photos and the written instructions are really helpful. Thank you!
Excellent article. Thank you.
how wonderful to see a fellow real shape woman proud and beautiful of herself and her accomplishments–thank you so much for your ideas and sharing yourself-L
This is really interesting. It has helped me understand once and for all that I would probably need the full bum (butt) adjustment once I move beyond adding a bit of height to the back of PJ pants. However as I plan to make for my mother later on I realise she will need the full belly adjustment, or to make it rhyme with the English vernacular I use, the full tum adjustment!
You explained everything so well, thank you for sharing xxx
Thank you so much for this clear, in-depth explanation! It makes so much sense and will be so useful next time I make pants. Awesome!
Very well done. Quite a difference. Thank you for all your hard work. It will be very helpful to us sewers.
Thanks. This is super helpful. You explain and show each step so well. And, of course, your happy smile is encouraging
Very helpful!
Super helpful, as I have a similar figure and would need the same adjustments. You explained and showed your steps wonderfully! I hope you will be contributing lots more here in the future. Thank you so much, Mon.
Kathleen
Good job! I have the same references in my library. It is interesting to see the theory applied.
Yes, I need this explanation!!! I also have a full belly after childbirth and wondered how to do an adjustment. Your details make this seem possible so I am going to try it on my next pants project. Thank you for taking the time to show this in “slow motion” for those of us who need visual and written instructions. Great job!
This looks spectacular! I cannot wait to try it.
Beautiful, nice explanation.
Thank you so much for detailed information. I have created similar instructions for presentations to my ASG group and I know how much work it is, to write and photograph and then combine into a coherent whole. Brava!!!
I’m especially appreciative, being the bearer of a significant panniculus myself. I have a well-fitting pants block, but would like to branch out into other pant designs and your information will be very helpful.
I’ve missed you at MexicanPink. Nice to have you here at CSC!
Great job!! Your perseverance is inspiring. I often get hung up on how, exactly, I want the finished garment to look and the way you managed the process is really helpful.
YES to #yearofpants!!
Wow, i LOVED this! You made it oh so clear and they look fantastic on you! I have a big stomach, too, and kind of gave up on sewing my own pants a awhile back, but you have encouraged me to try again. Thank you very much for that. And your back lanai are looks a lot like mine, haha! Thank you again, Ms. Lopez, looking forward to hearing from you again!
This is really helpful. Thank you for sharing.