Objective:
Convert a pattern for woven, elastic-waist pants, to a pattern for tie-front wrap pants
From this:

to this:

Who’s it for?
Anybody who wants to give it a try!
Any restrictions?
Before attempting this hack, you should be reasonably familiar with how regular pants go together
Difficulty
2 out of 5.
Supplies
For drafting your pattern:
* A pattern for non-stretch, pull-on pants with an elastic waistband, that fits you. I used, and recommend, HotPatterns 1190 Fast & Fabulous Pull-on Palazzo Pants
* Two large sheets of tracing paper (minimum)
* Pens/pencils
* Long Ruler
* Large Square (optional but helpful)
* French curve (optional but helpful)
* Pins or pattern weights
For sewing the pants:
* Main fabric, quite a lot – up to 4 x the distance from your waist to the ground.
* Knit fabric for waistband, 0.5m (or a t-shirt)
* Thread
* Non-roll waistband elastic, enough to go snugly but comfortably around your waist
Steps
1. Choose your fabric wisely
This design requires a fabric with a fluid drape. The drapier the better. I used a washed, medium-lightweight linen blend, and I wouldn’t recommend anything stiffer than that. I imagine rayon challis would be lovely. Chiffon or georgette would be risqué but gorgeous. Silk crepe or charmeuse would be the epitome of luxury. Quilting cotton or denim are right out.
Also keep in mind that the pattern pieces for this design are quite wide. A narrow fabric won’t do.
2. Create the new pattern
1. Lay the existing pattern pieces with the grain lines parallel, side edge to side edge, overlapping slightly at the widest point of the waist/hip area, so that the seam lines are touching.
2. Trace this joined shape, marking which is the front and back crotch curve, and making a mark at the waist edge, directly above where the hip seams connect.
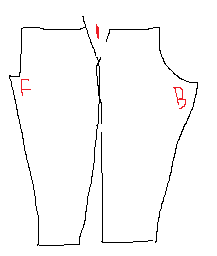

You will need a total of 2 copies of this shape.
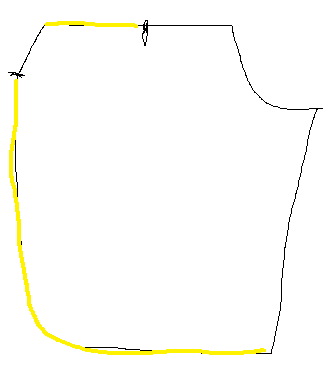
3. To make the front piece, take one pattern piece and draw a line straight down from waist to ankle, roughly halfway between the side seam and the center back seam of the original pants. To show a little leg, make the line closer to the side seam; for more modesty make it closer to center back. Cut off the scribbled-out part of the pattern piece along the line you drew. (pattern3front.png).
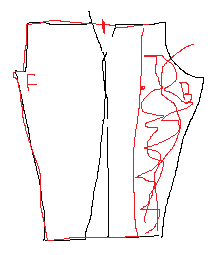
My final pattern piece looks like this:

4. To make the back piece, take the other pattern piece and draw a line straight down from waist to ankle, roughly halfway between the side seam and the center front seam of the original pants. Again, for more modest pants, go a bit closer to center front; to show some leg go closer to the side seam. Cut off the scribbled-out part of the pattern piece along the line you drew.
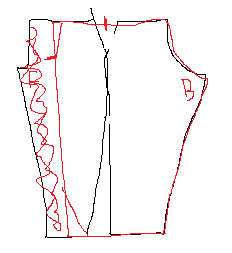
- Make a mark 6 – 8” from the waist, on the line you drew. Draw another line from that mark, back up to the waist, maybe an inch in from the edge. Cut off the thin triangle you just created.
- Round off the bottom corner of the edge you created – a French curve is really helpful, but a dinner plate might work too. My final pattern piece looks like this:

1. You will also need a piece for the front ties. Make a rectangle 3-4” tall by about 18” wide.
3. Cut out your fabric
I strongly, strongly, recommend making a test version before you cut into your real fabric.
Cut 2 fronts, 2 backs, and 2 ties from your main fabric, and one waistband on the fold from your knit fabric.
Be sure to transfer the marking from above the hips, and the mark where you changed the angle of the front edge, to your fabric.
Waistband Cheat: Use a t-shirt for the waistband
Rather than use the pattern piece for the knit waistband from the HP1190 pattern, I like to repurpose a t-shirt that has shrunk in the wash and become a little snug-fitting. Here’s how:
1. Cut off the hem
2. Make a tube by cutting off the top of the t-shirt, just below the armpits
3. Fold the top edge down to the bottom edge, press
4. Using a narrow zigzag stitch, make a seam about 1.5” above the cut edges, all the way around. (The precise distance should be the width of your elastic + the width of your seam allowance + a smidgen.)
4. Assemble the pants
1. Start by finishing your raw edges. I used a serger rolled hem, but a hand-rolled hem, or a narrow machine-stitched hem should work too.
- Finish both long sides, and one short side, of each tie
- Finish the bottom and back edges of the front pieces
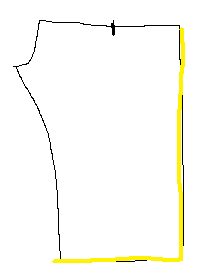
- Finish the bottom edge, the front edge from the bottom to your mark, and the top edge from the front corner to the hip mark, of the back pieces
2. Attach the ties to the back pieces
- Run a line of gathering stitches from your mark to the top of the front edge of the back piece
- Pull the gathers to fit the narrow edge of the tie
- Stitch the tie on, right sides together
3. Sew the fronts together at the crotch seam/center front, right sides together
4. Sew the backs together at the crotch seam/center back, right sides together
5. Make the front and back pieces do the splits. Match the crotch seams, right sides together, and sew the back and front together from ankle to crotch to ankle.
6. Wrap the back around the front – this is the hardest step to describe but not hard to do.
- Lay the pants with the wrong side up, and the front waist edge facing away from you. (Let the back dangle)
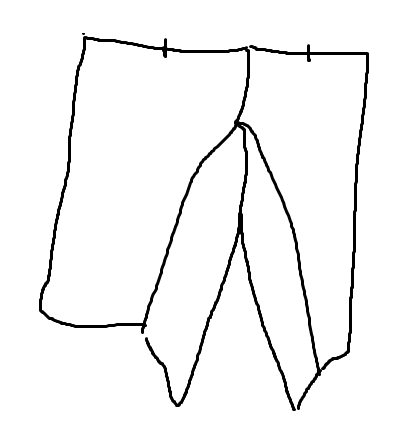
- Fold the side edges of the front pieces in towards the middle, folding at the mark above the hip on the waist edge.

- Bring the back waist up to meet the front waist, matching the above-the-hip notches
- Pin and baste along the waist edge, from the above-the-hip notches to the edges of the folded-over parts of the front.

7. Attach the waistband
7.1. If you didn’t use the T-shirt cheat, prepare the waistband (otherwise go to 7.2):
- Stitch the short ends together
- Fold the cut edges together and press
- Using a narrow zigzag stitch, make a seam about 1.5” above the cut edges, all the way around. (The precise distance should be the width of your elastic + the width of your seam allowance + a smidgen.)
7.2 Fold the free edges of the back pieces of the pants, down and out of the way
- Pin the waistband to the right side of the waist edge of the pants, stretching to fit and making sure not to catch the free edges of the back pieces.

- Stitch around the waist, being sure not to catch the free edges of the back pieces, and remembering to leave about an inch unsewn so you can insert the elastic.
- Thread the elastic through the waistband and sew the ends of the elastic together.
- Stitch up the remaining inch of waist seam.
That’s all there is to it, you’re done!

Swish around fabulously! Be sure to post pictures!
Troubleshooting
* If you find you’re showing too much leg, the pieces need to be wider. Try moving the edges out a bit
* If you want to show more leg, the pieces need to be narrower. Try moving the edges in a bit

I see you don’t monetize your page, don’t waste your
traffic, you can earn extra bucks every month because you’ve got high quality content.
If you want to know how to make extra bucks, search for: Mrdalekjd
methods for $$$
I think these look great, love them, but do you have to take them off completely to go to the loo?
It depends how tight you tie the front, and how big your hips are in proportion to your waist. With this design, I just loosen the front tie a bit and pull them down.
I had considered a more “authentic” design with ties front and back, but the loo was the reason I didn’t go with that style: I didn’t like the idea of fiddling with a knot behind my back when I had to go.
These pants are way cool! You look amazing in them! Thanx for sharing!
Your pattern hack turned out great with the pants and look great on you.