Hi everyone! So kicking off our “Extras and Accessories” theme, I’m here with a post on something that seems to be universally loved, but wrongfully feared: adding pockets to garments. Sewists everywhere always cry out a little “whelp!” on hearing a pattern has pockets, but in fact it’s so super easy to add them to any pattern with a side seam, that the world is actually your pocketed oyster!

Cashmerette Turner Dress with added pockets
Now of course there are lots of types of pockets, and in some cases, the pocket is cleverly integrated into the design of the garment – for instance, the Grainline Driftless Cardigan or my Cashmerette Rivermont Dress.

Cashmerette Rivermont Dress
However, one of the most popular types – and definitely one of the easiest to add – is a simple side seam pocket. The only pre-requisite for doing this is that the garment has side seams – that could be a skirt, dress, pants, a coat… anything! Pockets generally work best on wovens, or stable knits (like ponte) – on jersey, they sometimes sag down or stretch when you put anything in them.
If your garment doesn’t come with pockets, then you have a couple of options for the pattern piece. The most easy one is just to draw a pocket-shaped line around your own hand and use that – the pocket is on the inside, and honestly there’s no “wrong” way to do it! But in case you’d like something already drafted, you can download the Cashmerette Patterns side seam pocket piece (as featured on the Upton Dress and Lenox Shirtdress): click here to download for free: CSC Pocket. (Save the file to your computer, then open using free Adobe Reader to print).
You have an option of whether to make a simple free-floating version or an adapted version that is attached at the waistline – I’ll show you how to do both.
How to add free-floating side seam pockets
- Cut 2 sets of pockets (so 4 in total)
- Construct the front and back of the garment first, separately.
- Pin the pockets to the front of your garment, right sides together. You can place them at whatever height suits you – for me, it’s usually about 2 inches below the waist. Sew the pockets at the sides.

- Flip the pockets out, and press. Understitch close to the edge of the pocket, which secures it to the seam allowance underneath. This stops the pockets peeking out when you’re wearing the garment, particularly important if you’re using a contrast fabric!

- Repeat the same process with the back of your garment, and the second set of pockets.


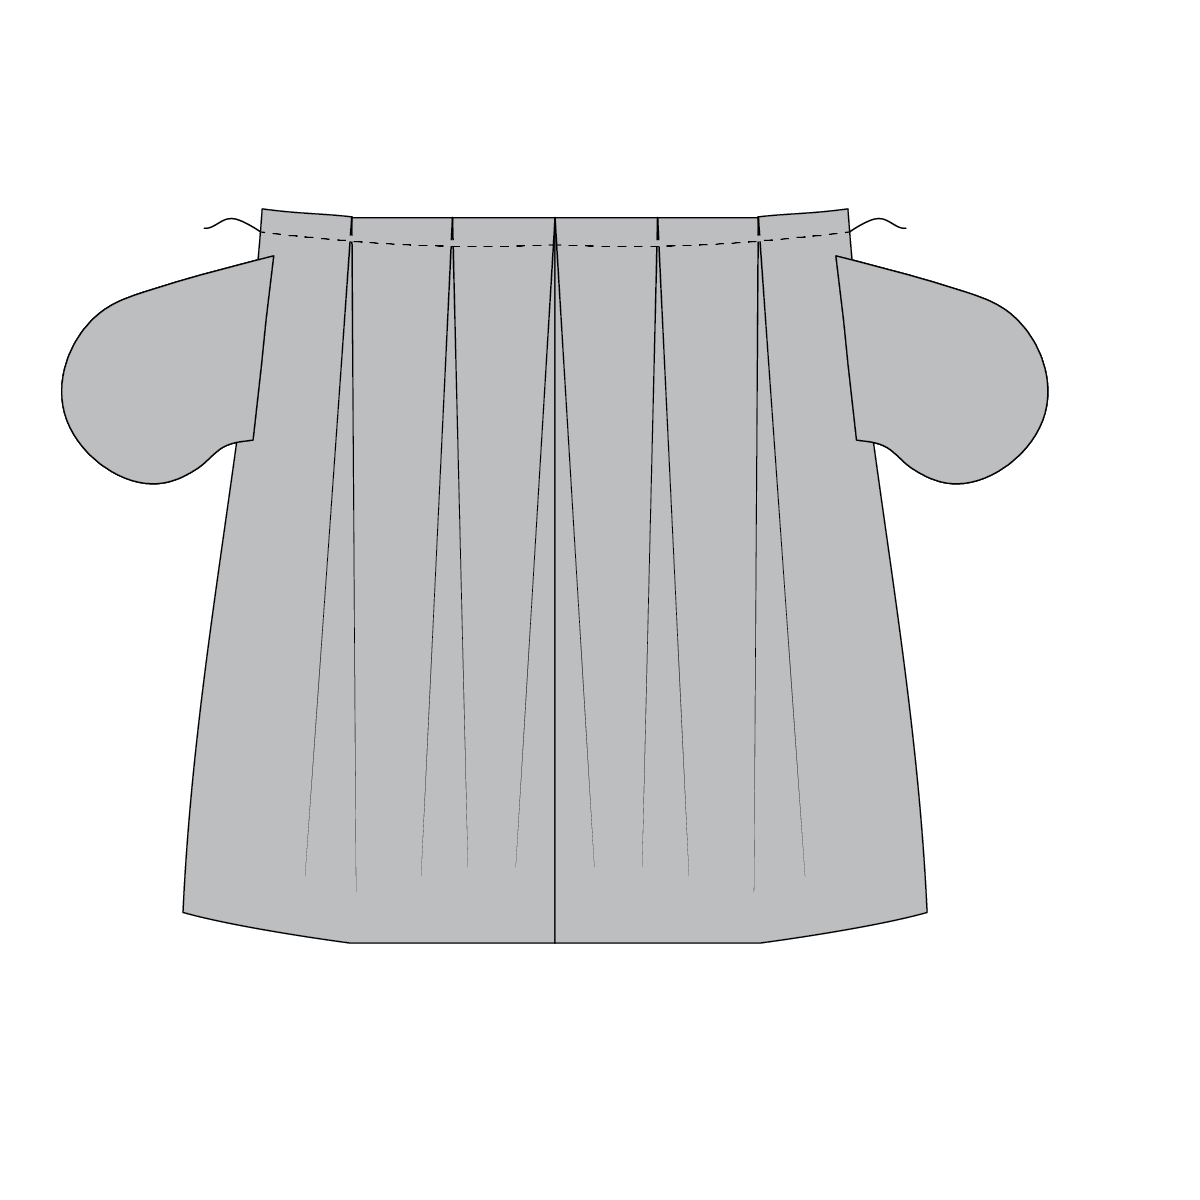
Pin the front and back of the garment, right sides together. Sew the side seams, going all the way around the edge of the pockets as shown. And you’re done! Complete any other steps (like adding a bodice or waistband, or hemming) and enjoy your pockets.
 How to add anchored side seam pockets

If you want to to avoid having your pockets flapping about, another option is to anchor them in your waistband. It’s a very similar process with just a few tweaks!
- Alter your pocket pieces, keeping the same lower part, but extending the top up all the way to your waistband, as shown below. An easy way to do this is to lay the pocket piece on top of the garment piece, lay tracing paper over and draw your new shape.
- Sew the pockets to the front of your garment, at the side seam.

3. Do steps 4 and 5 as explained above.
4. Pin the front and back garment right sides together. Sew the side seams as shown, starting at the top of the pocket (the very top of it will be open), and going down to the hem.

5. Press the pockets towards the center front of the garment. Sew the top of the pockets to the waistline of the FRONT only (i.e. don’t sew the whole garment closed!), within the seam allowance.

6. Finish your garment by completing any other steps (like adding a bodice or waistband, or hemming) then stick your essentials in your pockets and head off for the day!

Thanks for this great article! I am making a jumpsuit and would like to anchor my side seam pockets to the center front seam. Any recommendations for how to do this and make it look and feel professional?
Thanks again!
The main reason to anchor your pockets (in a waist seam) is not to keep them from flopping about, it’s to distribute the weight they carry more evenly, and not to have them distort your side seams. Since presumably we put pockets in garments in order to put stuff in them :-).
Also, you can improve the wear a lot by stabilizing the seam where the pocket is attached to the garment, twill tape does fine, or a selvage if your fabric is lightweight. Note that the front part of the pocket is usually what stretches out most, since the back tends to stay on the body, so stabilizing the front seam is the most useful.
Wherever possible, I add pockets to everything. For garments I’ll wear travelling, I add a security pocket usually closed with Velcro inside the regular pocket. Saf-t Pockets patterns have some good ones. Also snoop shopping travel clothing yields some good ideas. I do find that if a garment does not have enough ease through the high hip area, a side seam pocket tends to open up when I sit.
Thank you for this. I am new to the blog and just love the approach. I wondered what would count under extras and accessories. Pockets, Belts and what else do you have in mind? Decorative closures?
Yep anything that’s worn on the body, that’s not included in our other months.
Great post. An other option for a good pocket piece is to trace the pocket from a pair of MEN’s trousers. Seriously. Deeper pockets. Stuff doesn’t fall out when you sit down. I have even made the pocket pieces on women’s patterns deeper using that principle.
Good idea! I forget how easy it is to add pockets. This now has me thinking about moving the side seam of a favorite top to the front 1/2 – 1 inch. Then the pockets would be even easier to access (IMO) and there is the added bonus of another vertical line visible from the front. Thanks for the inspiration!
Good idea! I forget how easy it is to add pockets. This now has me thinking about moving the side seam of a favorite top to the front an inch or two. Then the pockets would be even easier to access (IMO) and there is the added bonus of another vertical line visible from the front. Thanks for the inspiration!
Thank You!! My daughter always complains about no pockets. I’m going to have to go to her house and see what she has that we can add pockets too now!!
Thanks !!!! I love pockets its one of the reasons I prefer to make my own over rtw.