Hello CSC readers! Today we have a fantastic guest post from Lynn of You Sew, Girl! If you’ve ever worked with a pattern with darts (or even an undarted pattern) and wished that it had princess seams to help get a better fit, Lynn’s tutorial will walk you through the process of converting darts to princess seams. Before reading her post, you’ll want to be familiar with FBAs and dart rotation, since dart conversion builds on those processes:
Introduction
Anyone who needs to make a large full bust adjustment (FBA) has to reconcile the BIG HONKIN’ DART (BHD) that usually results. With a high bust measurement of 34” to 36” and a full bust measurement of 40” to 42”, I typically make between a 1” and 2” FBA, which creates a large dart that is next to impossible to sew or keep neat.
For example, below is my first attempt at fitting Simplicity 4077 (OOP) from several years ago. The pattern has horizontal and vertical darts on the front and vertical darts on the back. I started with size 14 according to my high bust measurement and made a 2” FBA. The resulting dart had a width of 4” at its widest point.
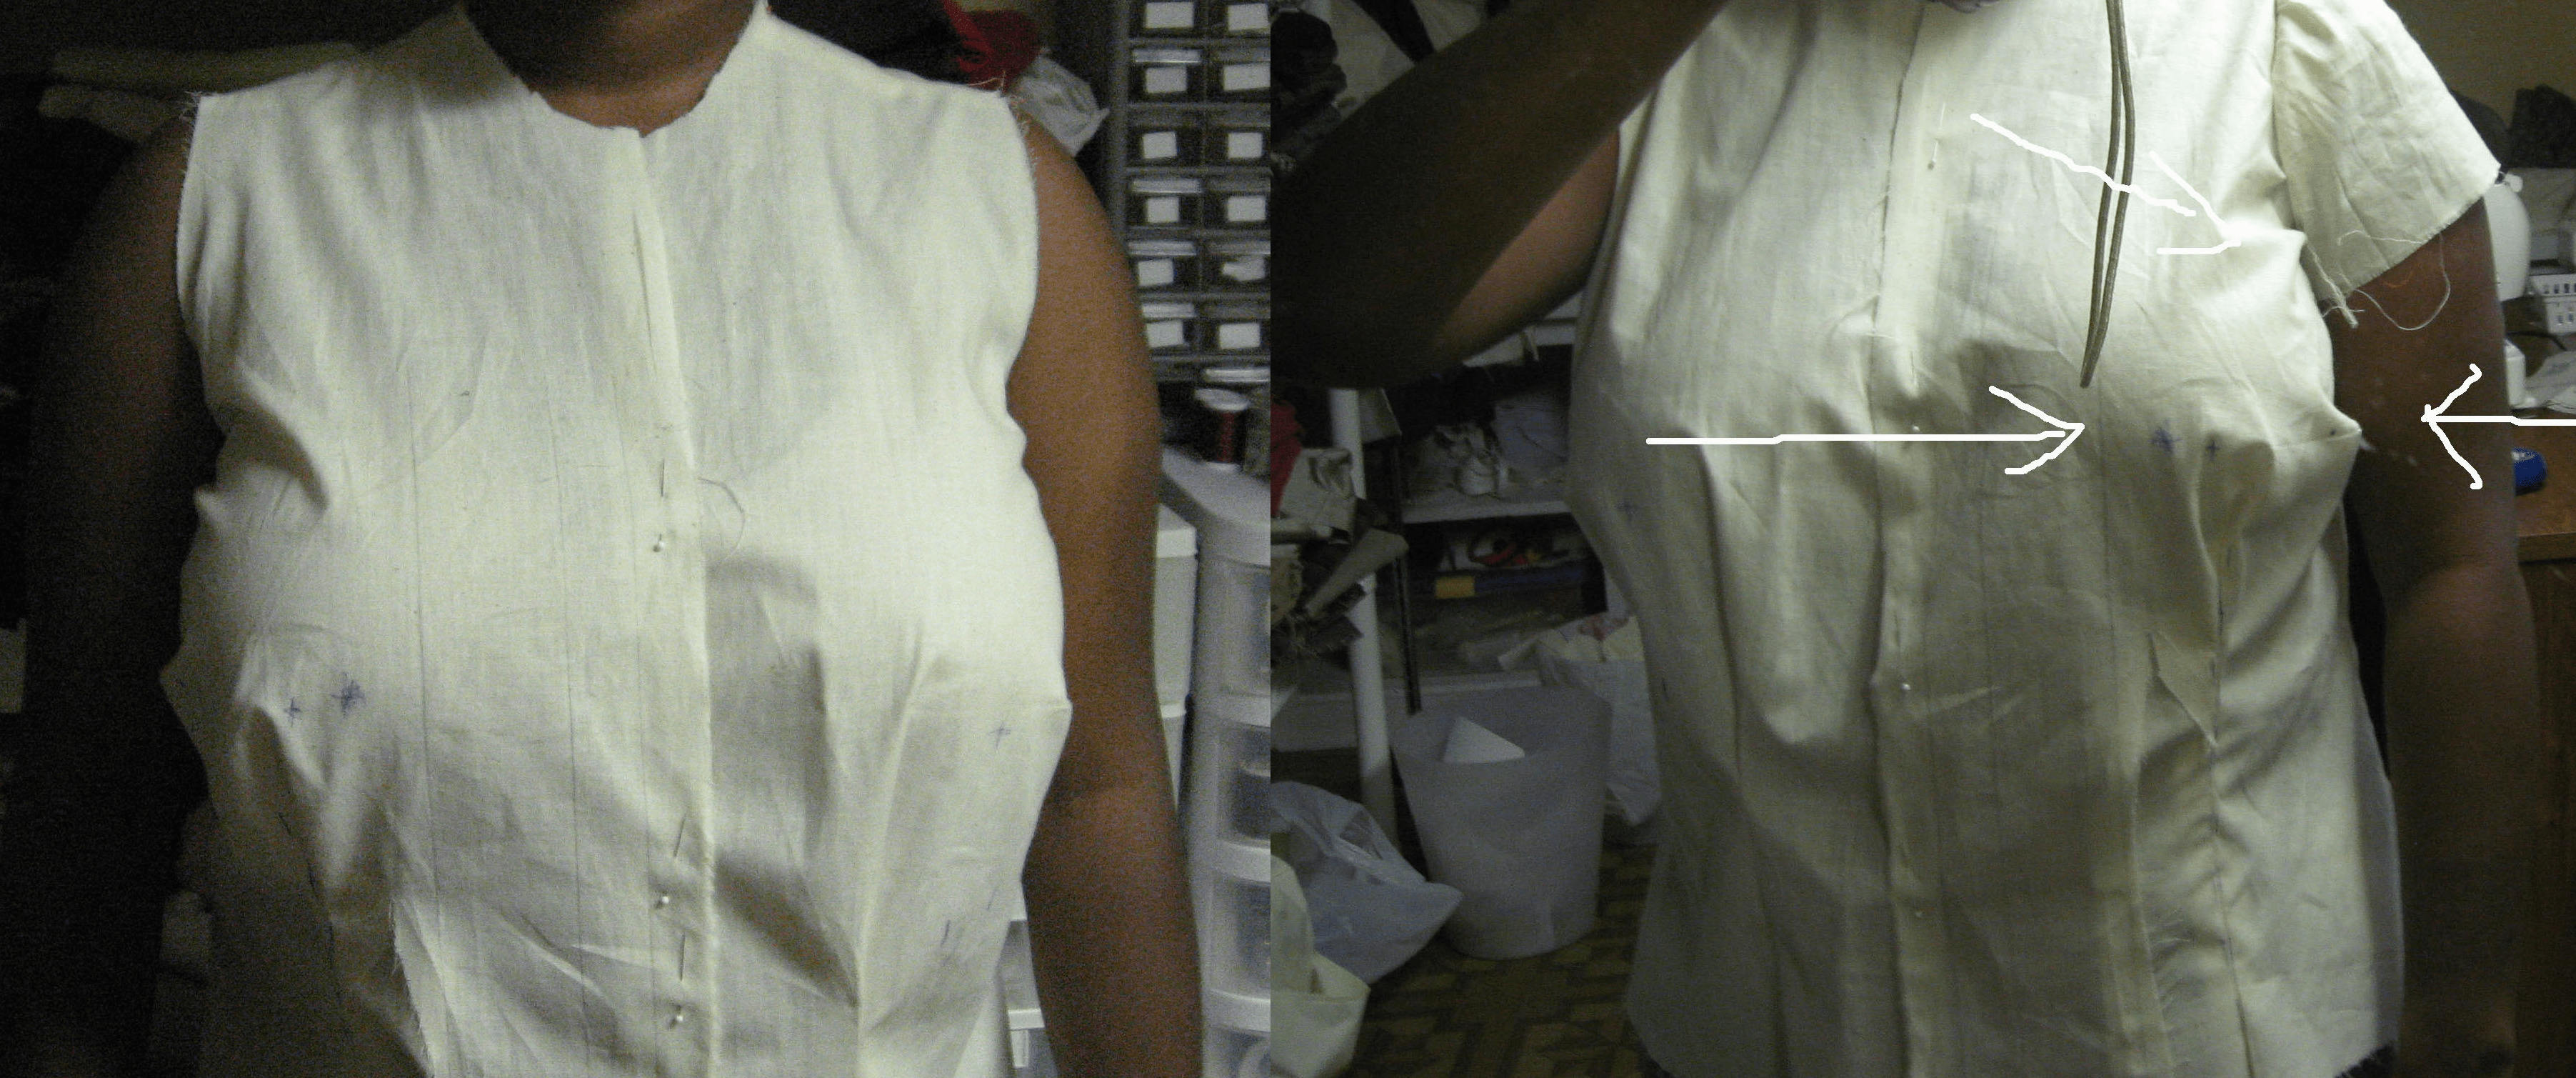
Simplicity 4077 (OOP): The Big Honkin’ Dart
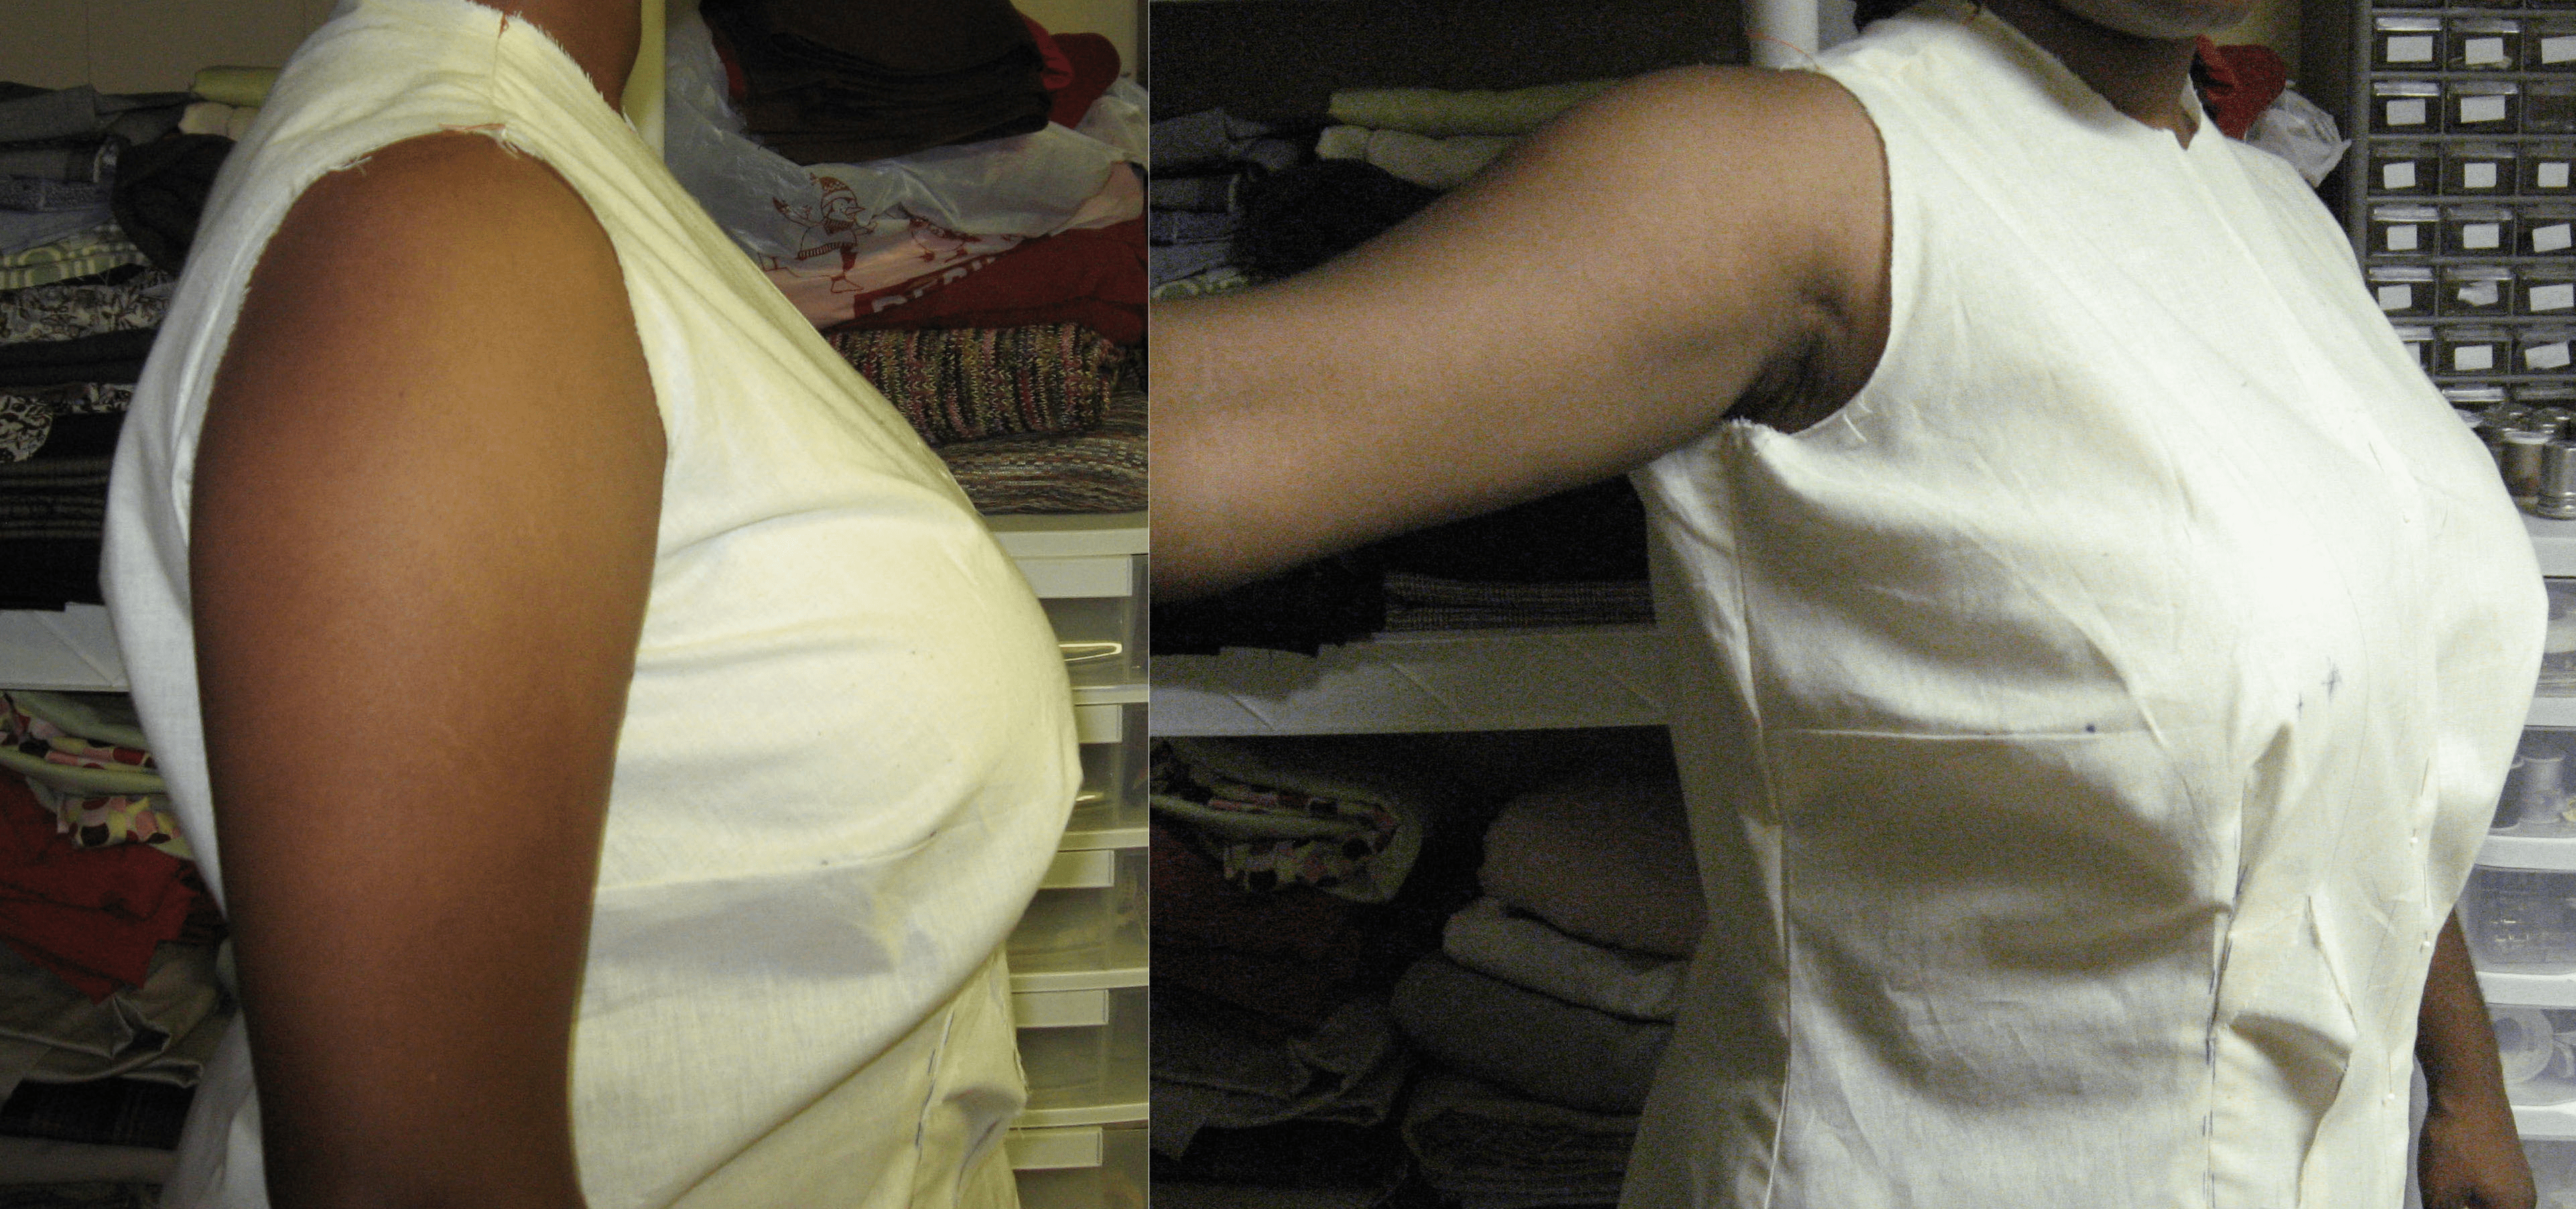
Side View: Big Honkin’ Dart
I became so frustrated with trying to reconcile the BHD that I trashed the muslin and stopped buying patterns that had darted fronts altogether.
Since then, I have learned that shoulder princess seams are more flattering on me. The design lines help to accentuate curves and present more opportunities for fitting the bust and shoulders. Having had recent success with fitting shoulder princess seams on a couple of coats and with converting back bodice darts to princess seams, I decided to try to do the same with the front.
I am going to describe how I got my first version of New Look 6407 to fit reasonably well by doing an FBA and changing the front and back to have shoulder princess seams.
Two disclaimers:
- The following pictures are my second attempt at this process and are not the pattern pieces I used to construct the actual shirt pictured in the post. I was so engrossed in the process the first time around, I neglected to take a single picture! The only difference between the two attempts is the size of the FBA. Everything else is exactly the same.
- I am NOT an expert. I used an article written by Connie Crawford [Crawford, C. (2013/2014, December/January). Add a Princess Seam. Threads (170), 46 – 51.] and searched the internet for guidance. Ultimately, I just did what I thought made sense.
I couldn’t find any information on which to do first: FBA then convert to princess seams, or convert to princess seams then the FBA. So I tried both ways. In either case, I started with an unaltered size 16. Both methods produced widely different results and I found that the FBA-then-conversion to princess seams method worked much better for me. I will touch on what happened when I tried the princess seams-then-FBA conversion at the end of this post.
FBA then Conversion to Princess Seams
- I started with a traced version of the pattern. I only had one copy and wanted to preserve the original in case I made an error. I copied the grainline somewhere in the area that will eventually become the side front.

Trace your pattern piece
- The horizontal dart looked a little high, so I redrew it to point closer to the vertical dart. Depending on the pattern, this may not be necessary.

Re-draw bust dart, if necessary
- Next, I used the slash-n-spread method to make a 2″ FBA.

Perform a slash-and-spread FBA.
Notice that to keep an even width down the front, a super large dart is needed. My dart measured 4.5″ at the widest point.
- To re-establish the vertical dart, I kept the right dart leg and copied the left leg from the original pattern.

Re-draw the waist dart legs.
I do not know if my methods is “correct”, but I realize that redrawing the dart like this takes away some of the additional width (at and below bust level) that is added by the FBA. Perhaps someone has a suggestion on how best to address this issue.
- . To find the shoulder princess line, I measured the width of the shoulder, minus seam allowances, and divided the result in half.

Measure the width of the shoulder.

Subtract the seam allowances.

Divide in half.
- Next, I drew a straight line from the middle shoulder mark to the top of the vertical dart. Then I used a curved ruler to soften this line so that the seam curves gently over the upper chest.

Draw in, then curve shoulder seam.
- I made hash marks for notches above and below the bust curve. Then, I cut along the curved line, stopping at the top of the vertical dart. Then I cut the bottom leg of the horizontal dart also stopping at the top of the vertical dart. Doing this turns the top of the vertical dart into a pivot point.I closed and taped the horizontal dart. This created a shoulder dart and the shoulder princess seam line.

Close the horizontal dart from the FBA, and create the shoulder princess seam line.
- To separate the panels, I continued cutting along the left leg of the vertical dart.

Separate the side panels.
- Notice that the side front panel has an unsightly point at the bust. I used a curved ruler to round this area.

Round off the point over the bust point.
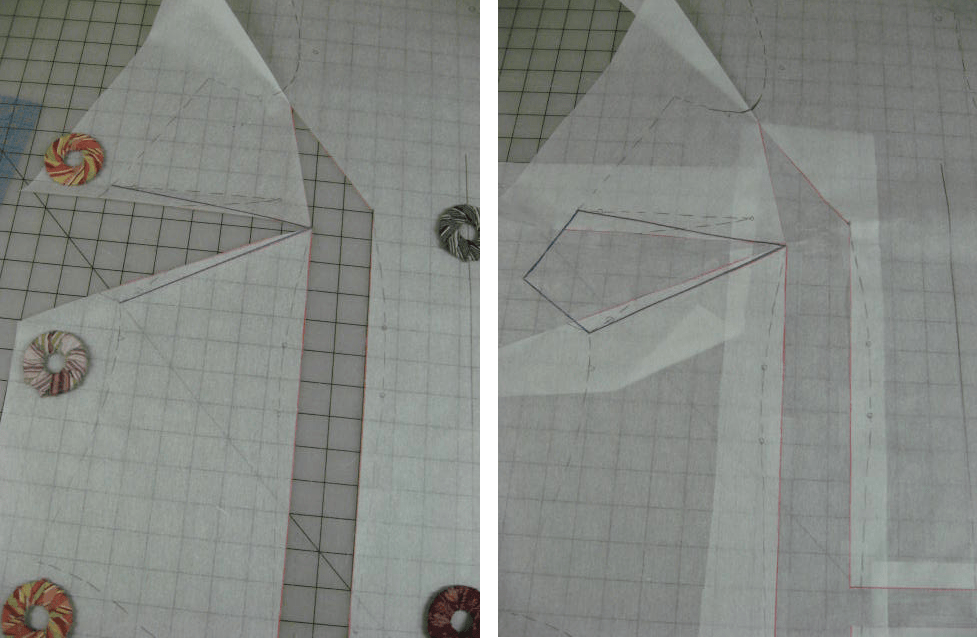
- Here are the front and side front pattern pieces. I marked “Add SA” everywhere to remind myself to add seam allowances.

Add seam allowances to the new princess seam.
- Connie Crawford suggests adding 1/2″ of ease at bust level on the side front panel only.

Add 1/2″ ease at the bust level on the side front panel.




Results
Using the pattern pieces from the first version (1.25” FBA converted to princess seams), 1″ seam allowances at the bust, and 1/2″ seam allowances everywhere else, below are photos of how the blouse fits:

Blouse fit
Note: The back bodice also has vertical darts. I used the same method described above to convert the darts to shoulder princess seams.
These pictures were of the in-progress garment. I was happy enough with the muslin to cut out my fashion fabric. Below are photos of the finished blouse.

Finished blouse
Conversion to Princess Seams, then FBA
First converting the darts to princess seams, then performing an FBA was less successful, in my opinion. Even though I have enough bust room, the resulting armhole on the side front panel was awkwardly skewed and the center front panel is too long.
The process is pretty much the same:
- Lower the horizontal dart.
- Mark the grainline in the area to become the side front panel.
- Find the shoulder princess mark on the shoulder.
- Draw the princess seam line from this mark to the top of the vertical dart.
- Cut along this line and along the lower horizontal dart leg.
- Close the horizontal dart.
- Mark notches in the bust area for matching.
- Separate the panels by cutting along the left leg of the vertical dart.
- Mark “Add SA” everywhere on both panels near the princess seam line.
- Make a 2” FBA using the slash-n-spread method.
Below are the two side front panels for comparison. The FBA-to-princess seams pattern is on top of the princess seams-to-FBA pattern. The differences are stark.

FBA-then-princess seams pattern piece laid on top of princess seams-then-FBA pattern piece
Converting to princess seams first and then performing the FBA (bottom pattern piece) resulted in about one-half an inch more width (for a total of one inch) at the bust line.

Extra width at bustline for princess seam-then-FBA version
However, the shoulder slope and armhole appear more dramatic and askew.

Shoulder slope and armhole askew in princess-seam-then-FBA version
Converting to princess seams first and then performing the FBA also provided a bit more vertical length on the side front.

More vertical length at side front in princess seams-then-FBA version
Above and at the bust line, the centers front for both methods are almost the same, with just a bit more width added by converting first.
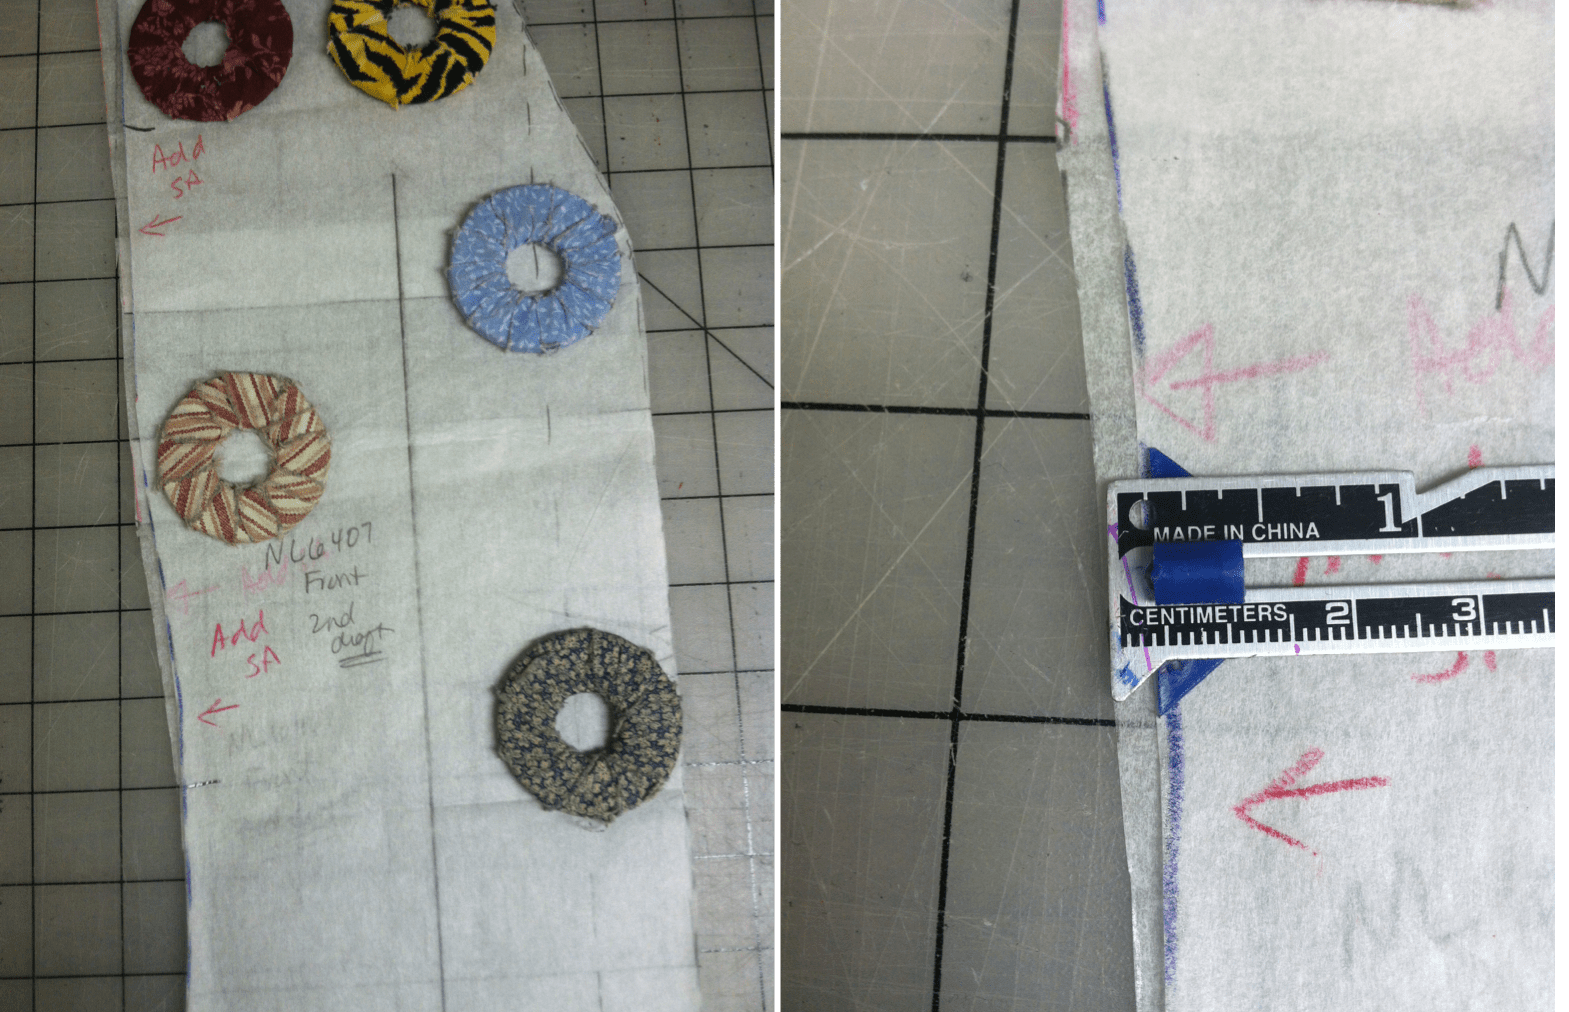
Comparison of CF pattern pieces
However, the lengths are drastically different.
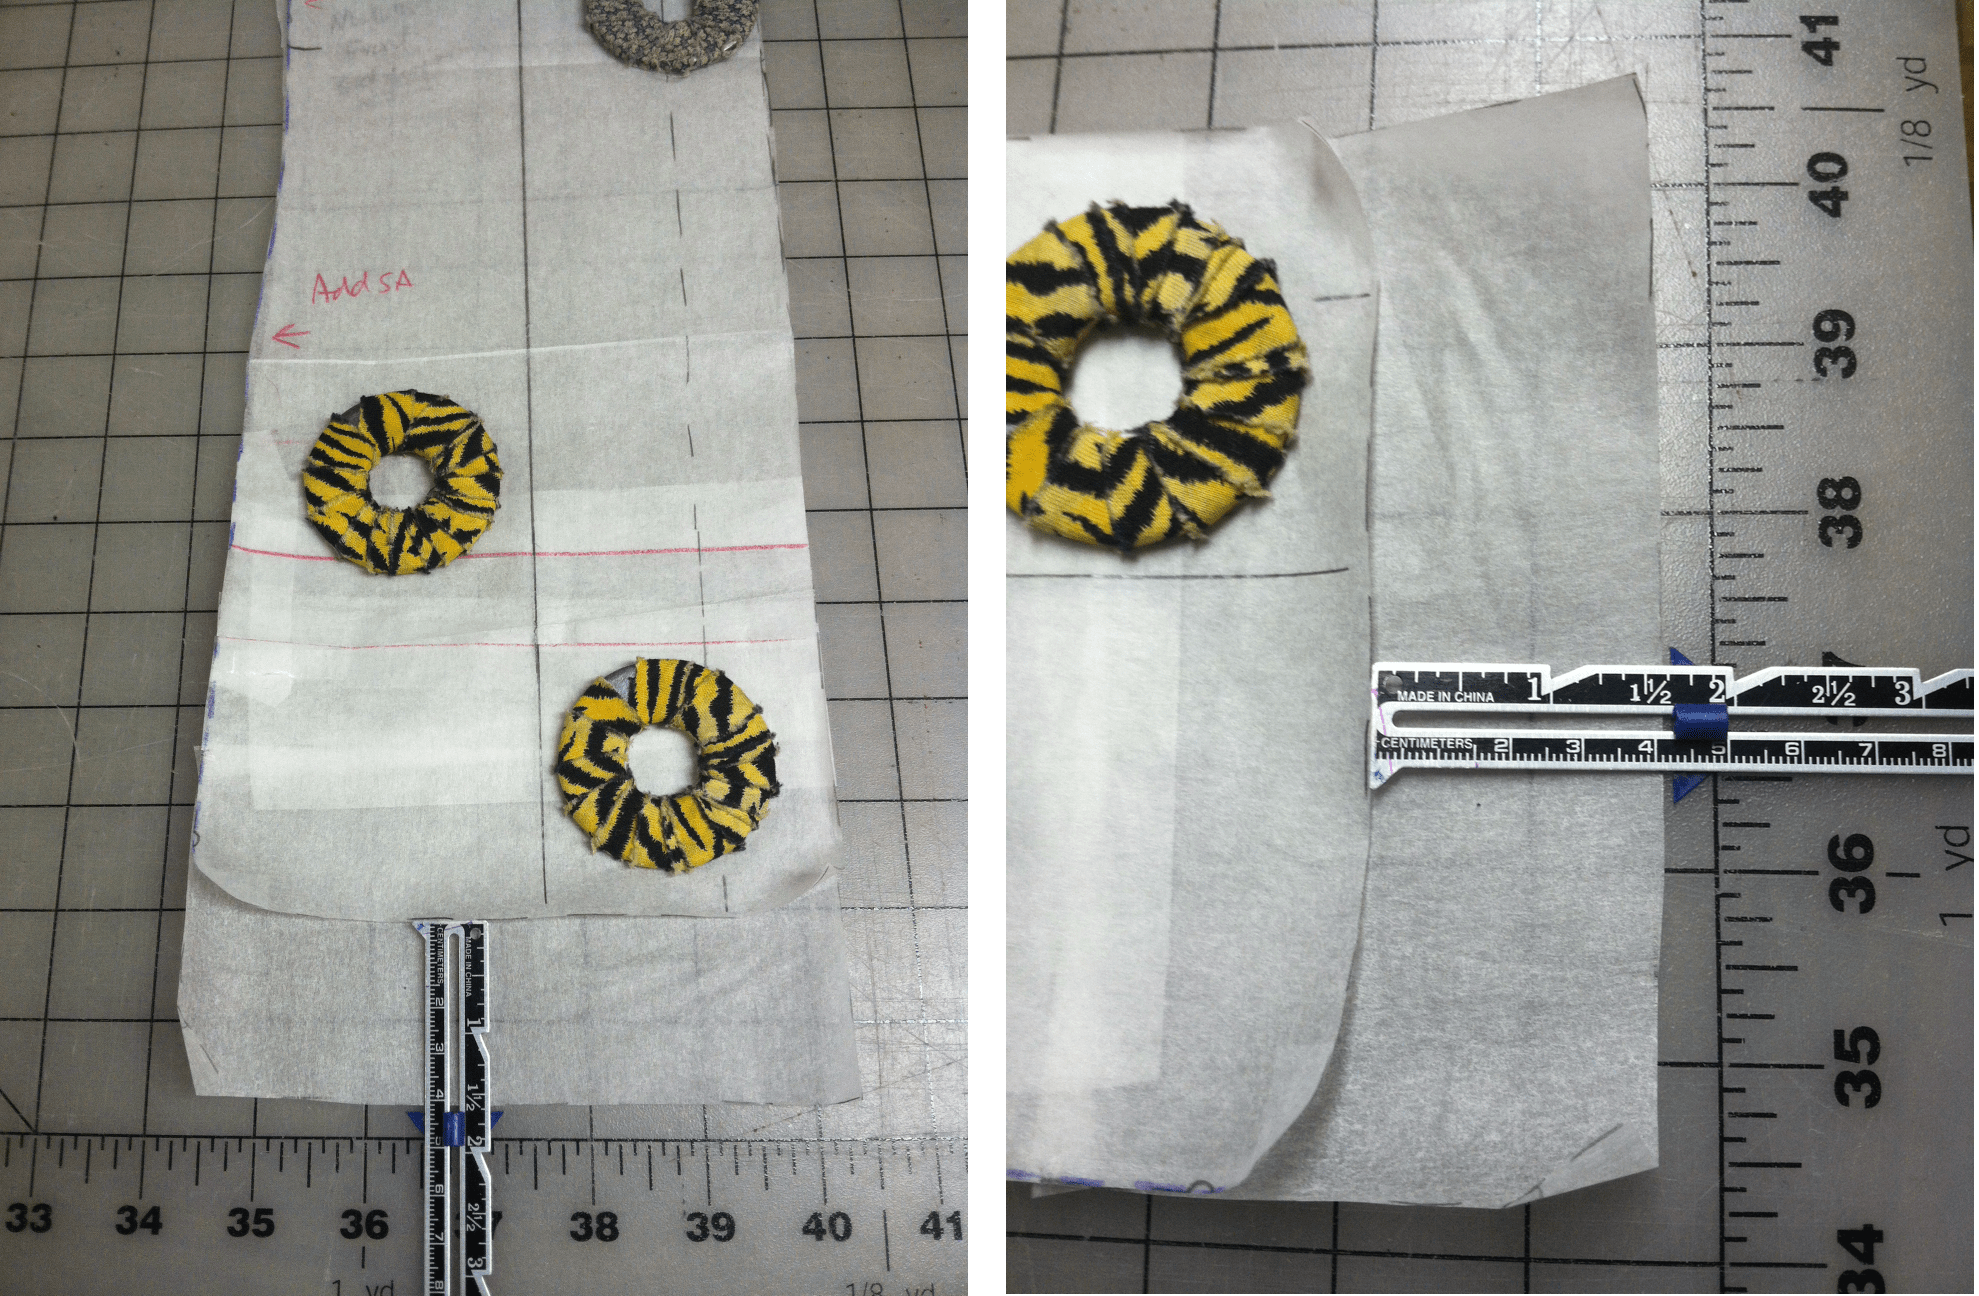
Length differences in CF pieces
Because I am five feet tall, the extra length has always been excessive and created horrible bunching above and below the bust.
Conclusion
Having tried both methods, performing the FBA first and then converting the result to princess seams is what I will do from now on. Even though I had to add an extra wide seam allowance, I was able to get the top to fit reasonably well. As such, I am more motivated to try darted fronts now knowing that I can make this conversion. I’m not going to go searching for darted fronts because working with already-established shoulder princess seams is much easier. However, if I find a design that I like, I am not afraid to tackle it.
About Lynn
Lynn is a city girl from Detroit and has been sewing garments since 2004. When not at the sewing machine, she is either throwing pots on the wheel, roller skating, biking, or traveling. She blogs at You sew, girl!.

That looks fantastic! I’m just learning how to alter patterns to fit, and have the same problem as you. I’ve been told by my sewing teacher that patterns with princess seams would be better for me – but there aren’t many about. Your tutorial will be a great help.
Whoa, this is impressive. I was just about to say, “This is over my head!” Then I scrolled to the pics of your finished blouse and, “Wow! That looks great!” came rolling off my lips. I’ll be rereading with keen interest. Thanks so much for recording and sharing your experience!
Your blouse looks very nice, thanks for the thorough instructions, I am just preparing to make a princess seam top to avoid the big honkin’ dart!
This is a seriously amazing walkthrough! Your blouse turned out wonderfully. Definitely something I’ll need to try out. 🙂
Very inspiring Lynn.
Great tutorial. Thank you so much for taking the time to let us know what works.
Thank you. I will try that. I sew for my girls regularly, but sewing for me except for skirts and some t-shirts has been disastrous so far, because I can not get the right fit. I will try the shoulder princess lines and see how that will work out.
Really nice fitting blouse – makes me more enthusiastic about this technique. (As an aside, an alternative is 2 parallel darts, rather than a BHD, such as when there is a large print that shouldn’t be broken up.) Thanks for sharing the differences between the FBA before and after – that’s really helpful!
Lynn, your work is very impressive. That is a lot of study and work but you have fabulous results. In learning to do this in the classroom environment one does a FBA from the “sloper” then transfers the darts to the princess seam. Nice to see what happens visually when you go the opposite direction. If you find the upper chest area too full, you can do a concave line from mid shoulder to BP. You won’t need to do much, maybe an 1/8 to 1/4 inch total depending on you body shape.
This is a well written and well photographed lesson. You did a great job of putting your ideas and methods down on “paper”.
I enjoy princess seams over BHD’s every time. Thanks for posting this.
Your blouse looks wonderful on you, Lynn!
Lynn, thank you for such an effective solution to FBA. Your muslin & fashion fabric blouses look fabulous and very becoming on you.
What a fantasticly flattering result on the BHD Lynn – good on you. I’m about to try my shirt pattern with a similar princess to shoulder, but have left a little bit of dart to the side for a ‘Dior’ dart. Here is a link to The Cutting Class on Dior darts; might be worth a look for ‘complicating’ your BHDs into the future!
http://thecuttingclass.com/post/109397219773/bust-shaping-considerations-at-balenciaga